Base Workflow: Set up a custom print template in
Đã sửa đổi vào: Mon, 31 Tháng 3, 2025 lúc 5:39 CH
To set up a custom print template in a workflow, go to https://workflow.base.vn/ or the Workflow icon on the App bar. Then, select the workflow you want to set up a print template for and follow these instructions:
Step 1: Prepare the print sample
You need to set up a print form according to your needs on the docx file, so that when printing, you can get the corresponding data from the system displayed right on the print file, you need to fill in the input key in the corresponding information line in the file.
* Note :
Custom data field codes must not match system default data fields (default fields updated at the end of the guide)
The code of each data field is unique and cannot be duplicated.
For custom information fields that are not default variables, go to Custom Fields >> Key icon >> Copy key and paste it into the docx file according to the structure ${data field code}
*Special: For tabular data fields, there are 2 ways to get data into the print form
- Method 1: Use variable syntax: ${inputkey-1-1}. In which:
+ inputkey: key of table-style custom field
+ -1-1: Coordinates of cell (row 1 row 1)
Similar to other rows
+ ${inputkey-2-1} Row 2 column 1
+ ${inputkey-3-1} Row 3 column 1
Example:
- Method 2: Automatically print table data in multiple lines with the syntax: ${column.<inputkey of table data field>.<column index>}
With column index = 0 => Automatically print out the serial number corresponding to the data rows in the table
For example: In a table with 15 rows of data, the order number will be automatically numbered from 1 -> 15.
With column index = 1,2,3,... => Automatically print out the values of the corresponding columns without having to fill in variables in each cell in the table.
Example
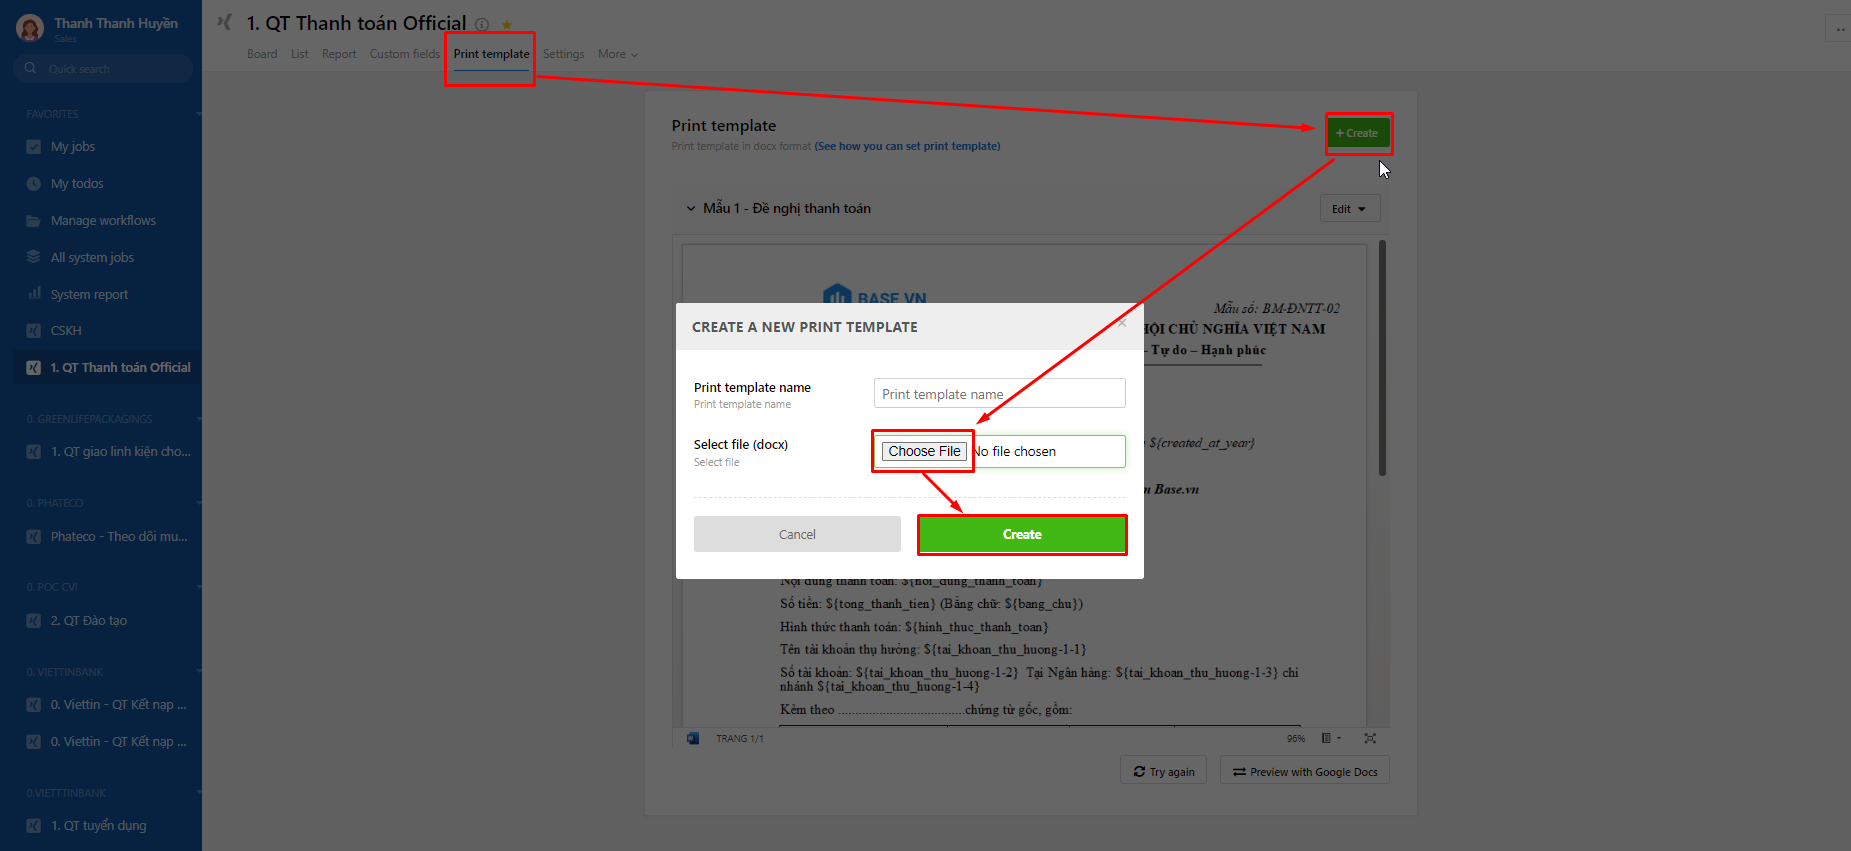
 Step 2: After completing the print template, in that workflow screen, select "Print Template" => select "Create"
Step 3: Select upload sample file and select "Create" to complete setup
Step 4: After successfully uploading the print sample will appear as shown
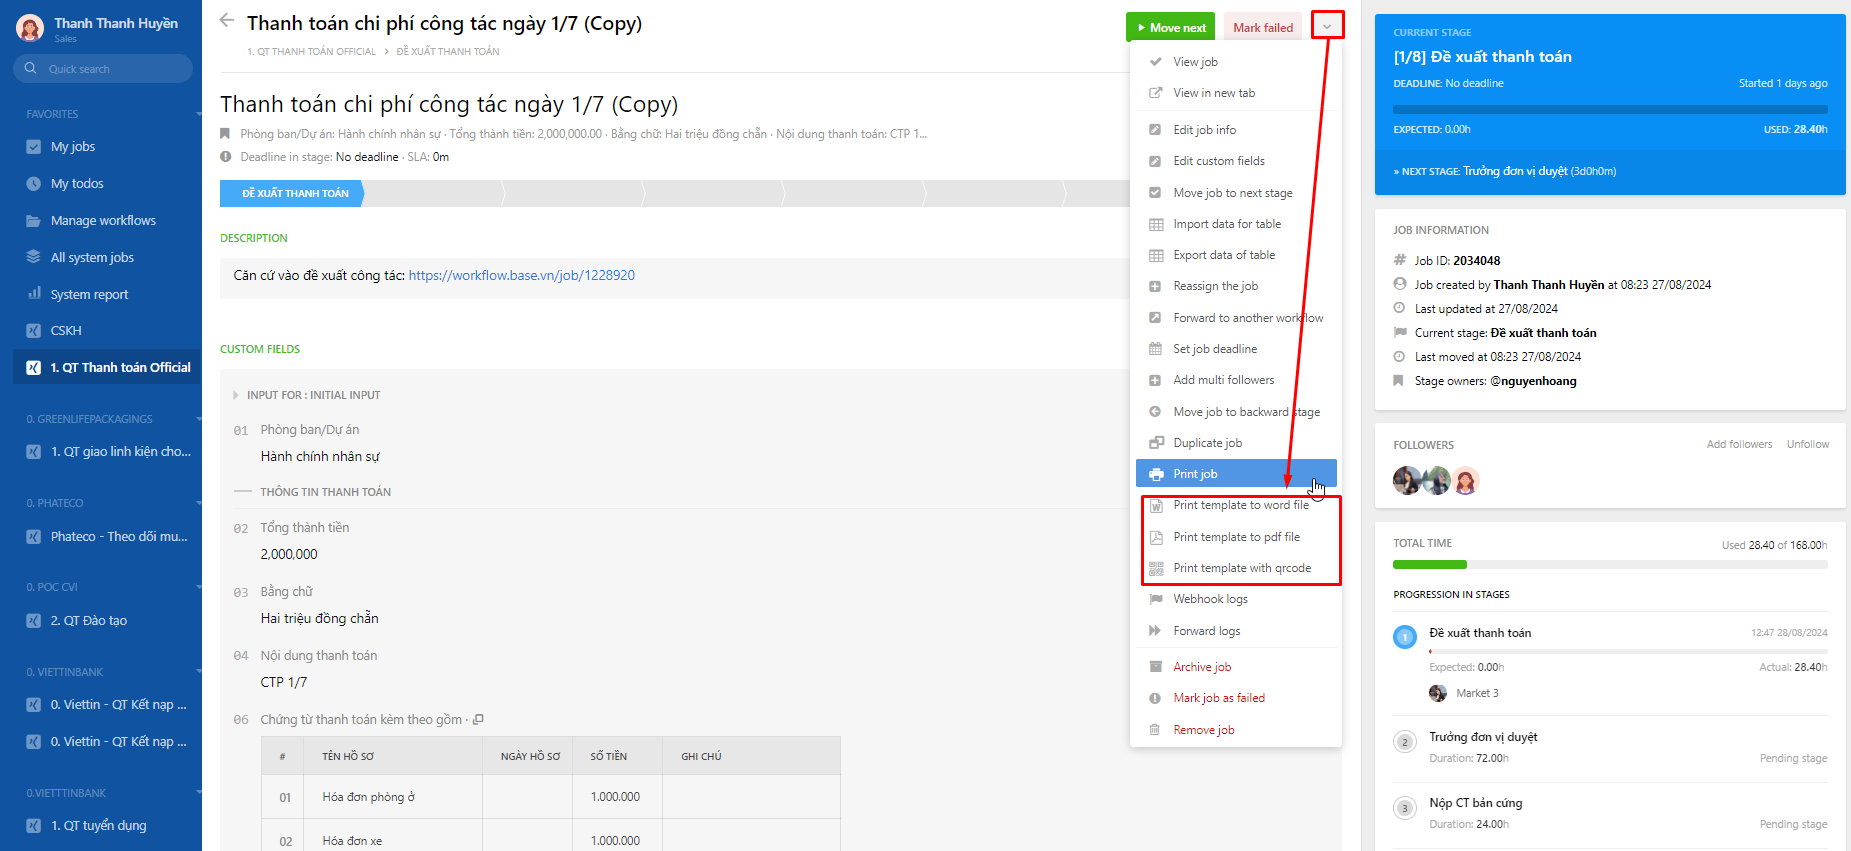
Step 5: Select the job you want to print according to the template >> Select the arrow icon >> choose Print template option
After successful execution, the print file will be downloaded to your device. Press Ctrl + P to print the file.
SYSTEM DEFAULT VARIABLES
Basic information
${id}: Job code (id)
${name}: Job name
${content}: Job description
${company}: Company name
${assignee_name}: Job recipient name
${assignee_username}: Username of the job recipient
${assignee_title}: Job title of the job recipient
${creator_name}: Job creator name
${creator_username}: Username of the job creator
${creator_title}: Job creator's job title
${created_at_date}: Job creation date
${created_at_datetime}: Date and time the job was created
${created_at_year}: Value of the year the job was created
${created_at_month}: Value of the month the job was created
${created_at_day}: Job creation date value
${finish_at_date}: Job completion date (May 22, 2021)
${finish_at_datetime}: Job completion date and time (May 22, 2021)
${finish_at_year}: Value of the year the job was completed
${finish_at_month}: Value of the month the job is completed
${finish_at_day}: Job completion date value
${job_followers_name}: List of job follower names
${job_followers_username}: List of job follower usernames
${job_followers_name_username_title}: List of job followers' names, usernames and job titles
Custom Fields
${long_text_124234} : Custom field with code long_text_124234
${table_abc} : Custom field with code table_abc
${table_abc-1-2}: Cell value in row 1 column 2 of custom field with code table_abc
${table_abc-3-5}: Cell value in row 3 column 5 of custom field with code table_abc
With the Sum row, you do not neet any key to print the data
Workflow information
${workflow_name}: Workflow name
${workflow_duration}: Duration of the job in the workflow
Current stage information
${stage_current_name}: Current stage name
${stage_current_start_date}: Job date in the current stage
${stage_current_start_datetime}: Date and time the job enters the current stage
${stage_current_deadline_date}: Job deadline date in the current stage
${stage_current_deadline_datetime}: The job's deadline date and time in the current stage
${stage_current_duration}: The duration of the job in the current stage
${stage_current_owners_name}: List of stage administrator names
${stage_current_owners_username}: List of stage administrator usernames
${stage_current_owners_name_username_title}: List of stage administrator names, usernames and job titles
Information on completed stages
${stage_done_assignee_name}: Job recipient name at stage done
${stage_done_assignee_username}: Username of the job recipient at the completed stage
${stage_done_assignee_title}: Job title of the job recipient at the stage of completion
${stage_done_start_datetime}: Date and time the job entered stage completion
${stage_failed_assignee_name}: Job recipient name at failed stage
${stage_failed_assignee_username}: Username of the person who received the job at the failed stage
${stage_failed_assignee_title}: Job title of the job recipient at the failed stage
${stage_failed_start_datetime}: Date and time the job entered the failed stage
Information on active stages
${stage_active_name_1}: Stage 1 name
${stage_active_assignee_name_1}: Job recipient name in stage 1
${stage_active_assignee_username_1}: Username of the person receiving the job in stage 1
${stage_active_assignee_title_1}: Job title of the job recipient in stage 1
${stage_active_owners_name_1}: List of stage 1 administrator names
${stage_active_owners_username_1}: List of stage 1 administrator usernames
${stage_active_owners_name_username_title_1}: List of names, usernames, job titles of administrators in stage 1
${stage_active_duration_1}: Duration of the job in stage 1
${stage_active_start_datetime_1}: Date and time the job enters stage 1
${stage_active_end_datetime_1}: Date and time the job exited stage 1
${stage_active_deadline_datetime_1}: The job's deadline date and time in stage 1
${stage_active_name_2}: Stage 2 name
${stage_active_assignee_name_2}: Job recipient name in stage 2
${stage_active_assignee_username_2}: Username of the person receiving the job in stage 2
${stage_active_assignee_title_2}: Job title of the job recipient in stage 2
${stage_active_owners_name_2}: List of stage 2 administrator names
${stage_active_owners_username_2}: List of stage 2 administrator usernames
${stage_active_owners_name_username_title_2}: List of names, usernames, job titles of administrators in stage 2
${stage_active_duration_2}: Duration of the job in stage 2
${stage_active_start_datetime_2}: Date and time the job enters stage 2
${stage_active_end_datetime_2}: Date and time the job exited stage 2
${stage_active_deadline_datetime_2}: The job's deadline date and time in stage 2
Câu trả lời này có giúp ích cho bạn không? Yes No
Send feedbackRất tiếc là chúng tôi không giúp được nhiều. Hãy giúp chúng tôi cải thiện bài viết này bằng phản hồi của bạn.


